
Self-watering pots are convenient for many reasons but what are their advantages and disadvantages? You can get self-watering pots in pretty much any size, form, and color but one question comes up again and again.
So how do self-watering Pots work? Self-watering pots and planters have a water reservoir in the bottom part that supplies the soil of your plant with the necessary water through capillary action. This is the same action that allows a sponge to absorb water.
The layout and design of the self-watering pot may vary from pot to pot but the basic principle is the same.
What is a Self-Watering Pot or Planter?
Although as the name suggests, a self-watering pot or planter isn’t magical and won’t water itself, it does provide a constant source of water for your plants.
This allows you to water less frequently, as well as checking the soil of your pots to make sure that they are adequately moisturized.
There are different types of self-watering pots available, but the basic principle is the same; water is poured into a reservoir under the plant, which is provided to the plants through wicking action, or capillary action. (More on this below).
There are many pros to using a self-watering planter, and only a few cons.
It makes keeping your plants adequately watered so much easier and takes the guessing work out of gardening.
There are multiple options available when purchasing these types of pots or planters, and the type that you choose really does boil down to your personal preference, as well as the size that is needed.
Self-watering planters are especially useful for vegetables or any plant that is needing to be constantly watered.
In some cases, you will probably find that these types of plants appear to have higher yield amounts, and look fuller when using a self-watering system.
However, there are some plants that do not thrive with an excess of moisture and should be avoided when using a self-watering planter.
In my opinion, the best self-watering planters are high drainage and aerating ones. This one from Amazon is quite good and not all that expensive either.
How do Self-Watering Pots Work?
Traditionally when it comes to watering plants, we would water the leaves and the soil; this would ensure that water is absorbed from the roots, and minimally through the leaves.
By closely watering the soil of a plant, the water would be absorbed by the roots of the plant, providing necessary nutrients.
With a self-watering pot, use what is referred to as a wicking system, or capillary action, in order to provide the necessary moisture from a reservoir; this way you will not have to keep track of the moisture level of the soil in order for the plant to live and grow.
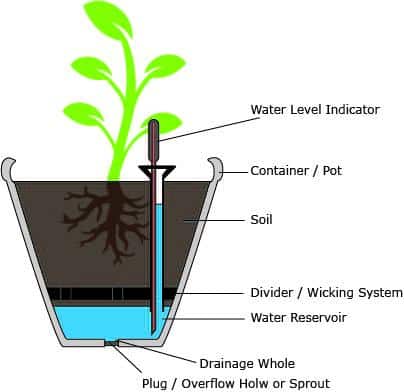
There are four main parts of a self-watering pot that you should be aware of: the growing bed, potting soil, water reservoir, and the wicking system.
All of these components work with each other in order to ensure that your plant is getting the necessary moisture and nutrients that it needs.
As the plant roots absorb water, the soil wicks up more; which maintains a constant level of moisture in the soil.
As mentioned above, the way that these pots work to successfully keep enough moisture in the soil is by a method called “capillary action”.
This is the same action that allows a sponge to absorb water, or a paintbrush to absorb paint.
To get scientific for a minute, this is caused by the intermolecular attraction in liquids in conjuncture with the attracting forces between a liquid and a solid with narrow tubes. Cohesion is the attractive force between ‘like’ particles, while adhesion is the attractive force between ‘unlike’ objects.
Now imagine that the adhesive force of the liquid and solid is greater than the cohesive force within the liquid, the liquid will be propelled within these spaces.
Basically, the planters have water in the bottom that constantly feeds the plant through the roots and allows the soil to stay constantly moist.
Parts and Features of a Self-Watering Pot or Planter
There are other parts that are included in your self-watering pot or planter, and these all work together to make sure that your planter is performing its job adequately, and supplying water to your plants constantly.
Typically, a self-watering planter will have the following parts included:
- Water reservoir
- Planting container
- Fill tube
- Wicking system
- Water level indicator
- Drainage hole
- Plug Overflow hole or spout
The Reservoir
In every self-watering planter, there will be two main chambers; a top and a bottom.
The top chamber will be where the soil and plant(s) are located, while the bottom chamber is where you will find the reservoir.
Reservoirs will vary in size, but are usually in proportion to the overall size of your planter; so if you need a larger planter, the reservoir will generally be larger as well.
For instance, in a large container it is not unusual to have a 5-gallon container; while in smaller planters, you may only have a 1-gallon container.
When looking to buy your planter, you should try to determine how big of a reservoir you want, to avoid filling it as often.
The Fill Tube
In addition to the reservoir and chamber for the plant, there will also be an opening of some kind, commonly referred to as a fill tube.
This is used to pour water directly into the reservoir, making it so that you will not have to remove the top chamber in order to keep water in the reserve.
The opening for this tube is generally found on the top, around one of the corners.
Some self-watering pots and planters will have a removable cap at the opening of this tube to ensure that debris is kept out of the reservoir.
The Indicator
In addition to the easy access fill tube, a lot of planters will also have an indicator that lets you know when you should fill the reservoir; in some cases, this will be a view on the side, or an object similar to a bobber when fishing.
All self-watering pots should have a mechanism that prevents overflow, allowing water to drain out of the reservoir is filled too full.
This will ensure that the plants are not sitting in water, which as we know can lead to issues down the road.
The Plug Overflow Hole or Spout
Lastly, a drainage hole with a plug (think of a bathtub) allows you to drain the water out of the planter when needed.
This is particularly useful when the seasons change, as you will want to make sure that the water in the reservoir does not freeze; as this can lead to cracking and other damages to your planter.
Types of Self-Watering Pots
There may be several styles of self-watering pots available, but the basis is the same: you will have the pot that the plant sits on, then underneath there will be another chamber that holds the water to keep a constant water supply for the roots of the plant.
There are some that are more decorative, while others are better suited for herbs and vegetables.
Due to the nature of the pots, there are none available for larger plants such as fruit trees and shrubs, and the reasoning behind this is that the roots will end up growing into the water chamber, and this can lead to stagnation as well as root corruption.
The type of self-watering pot or planter that you choose to use is determined by the aesthetic you are going for, as well as the type of plant that you are growing.
Additionally, there are some pots that have a higher capacity, which will allow you to have more water in the reservoir, allowing you to water even less.
For instance, if you are using your self-watering planter for herbs and vegetables, you generally will not need to have a planter with a large reservoir.
There are a wide array of designs that are available for self-watering planters, and the choice of which to purchase is personal preference, although it should be taken into account when choosing a planter the type of plants that will be benefitting; as well as how big you will need the reservoir to be.
Cost will most likely factor in, as well; as expected, larger self-watering planters will have a higher cost point associated with them.
Basically, it all comes down to what you need, the look you are going for, and how much you would be willing to pay.
Self-watering pots and planters do have a higher initial cost, but you will be saving on time and water.
Advantages of Self-watering Pots
There are many advantages of self-watering pots, and they are extremely helpful if you don’t have a ‘green thumb’, so to speak.
There is generally no guessing when it comes to these pots, and you can simply leave them alone and let them do their job.
For instance, in warmer climates, some plants may need to be watered twice a day. Although this may not seem like a big deal, it can become tedious; especially if you forget for even just a day.
When this happens, it can shock the plants that you forgot to water, and you may need to nurse them back to health.
These planters will have a reservoir that is used to water the plants, and give you peace of mind in knowing that the plants are getting the water that they need in order to live and breathe.
Below are the following top advantages of having a self-watering pot in your home, apartment, or garden.
The consistency of self-watering plants is especially helpful for plants that are needing to be constantly watered; like vegetables.
With these plants, you will generally find that you find more growth and higher yield when using a self-watering pot or planter.
It should be noted, however, that some plants such as succulents and cacti do not do well with a constant water source, as they do not thrive in moist conditions.
- Conserves on Water: Due to the design of self-watering plants, they naturally conserve water by the use of a reservoir system; there is no seepage or evaporation, as the water is beneath the plant, and is watering the roots instead of the soil. Different from traditional planters, self-watering pots slowly release water into the soil so there is no excess water that needs to drain off.
- Encourages Root Growth: Self-watering pots encourage healthy root growth, as there is room underneath for them to grow while receiving an adequate amount of water. With normal pots, root growth would need to be encouraged by what is referred to as ‘deep watering’. However, this type of watering can saturate the roots too much which can increase the risks of stagnation; which can intern lead to root decay. Self-watering pots and planters enable constant watering without stifling the roots or leaving the water stagnant.
- No-Fuss Gardening: One of the greatest attractive features of the self-watering pots and planters is that you don’t need to constantly check your plants to make sure they are getting adequate water to survive and thrive. While you will still need to check the water reserves, this is far less frequent, and you can rest easy knowing that your plants are getting the water that they need, directly to their roots. Using these types of planters also allows you to leave your home for extended periods of time without needing someone to come by and check on your plants. For instance, if you are on vacation; you will be able to leave your plants at home and know they will be as healthy as they were when you return.
- Soil Retains Nutrition: As you may know, if you over-water your plants, you can see some of the soil running off the top. This, unfortunately, makes some of the nutrients that are found in the soil runoff as well. Additionally, even without over-watering, there is still bound to some water draining from the bottom, and with that comes nutrients from the soil as well. In this way, it would become necessary to replace the soil over time. With the way that self-watering planters are designed, there is no soil drainage or run-off, and there is no need to replace the soil.
Disadvantages of Self-Watering Pots
Although self-watering pots and planters are a great way to make sure that your plants are always getting the water needed, and giving you peace of mind, there are a few disadvantages associated with them as well.
In the following section, we will be going over what these may be.
- Not for large plants: self-watering pots and planters are great for normal plants, but they will be unsuitable for larger plants and trees, such as fruit trees and shrubs. This is because these types of plant’s roots will eventually grow into the water reserve at the bottom of the planter; as mentioned above, over-crowding of the roots can lead to stagnating and root corruption.
- More expensive than regular pots: Although in the long run is a very good investment, especially for those with busy and hectic lifestyles, the initial cost can be more than traditional pots. This is not to deter you from purchasing a self-watering pot or plant, but just to note that you will end up spending more up-front for them. This can especially eat into your budget if you are planning to convert all of your current pots into self-watering ones. If you are looking to live more of a green lifestyle, it should be noted that in most cases, these self-watering pots and planters are made of plastic; they may have more of an impact on the environment than traditional terra cotta pots.
How to Set Up Your Self-Watering Pot or Planter
Setting up your new self-watering pot or planter is easy, but it may seem daunting at first, especially if this is your first time.
In the following section, we will go over the basic steps to install all the parts that came with the pot in an easy to follow step-by-step process.
- Insert all parts into the container (you may want to refer to the user’s manual that came with your pot or planter, but the basics should be the same for any of them).
- Add the potting mix of choice to your planter; some brands will have soil that is specifically designed for self-watering pots and planters, but any high-quality soil should work just fine. You will, however, want to avoid dry potting mix, and you will want to moisten the soil before placement into the planter.
- Pack in the moistened soil and add your favorite plants; just make sure that the soil is not too tight, you will want the plant to be supported without feeling constricted.
- Remove any air pockets by watering the plant from the top (generally from this point forward, your plant will receive water from the reservoir).
- Wait for a few minutes for the water to travel down through the soil and into the reservoir, then add the recommended amount of water. For the first few days, you will want to make sure that the reservoir is completely full; after that, your plant should have acclimated and you can let the reservoir do its job, with just checking ever so often.
What About at the End of the Season?
If you are using a self-watering pot or planter outside, and live somewhere with four seasons, there are steps that should be taken at the end of the planting season to ensure the life of your planter.
You will want to remove the potting soil from the planter and save for next year (if desired); then you will want to drain the reservoir and clean it.
In some cases, roots can start to be attracted to the water in the reservoir, and grow down into it.
This is especially true for plants like potatoes, or anything that aggressively seeks water.
It should be noted, however, that if you do not live in an area that reaches freezing temperatures in winter, there is no need to drain the water from the reservoir, as it is not at risk of cracking or splitting due to the cold.
How Often Do you Fill Self-Watering Pots?
How often you fill the reservoir on your self-watering pot or planter will be determined by the type of plant, as well as how big the water reserve section of the planter is.
A good rule of thumb is to check often at first to get a gauge on how much water your plant is wicking up through the roots.
Some plants are more ‘water-needy’, and as such will require you to fill up the reservoir more often. Generally, you will be able to see how much water is left in the water reserve without needing to remove the reservoir.
Whenever I have a new plant that has a self-watering pot or planter, I usually will fill the reservoir around once a week.
It is rare that I have had to do this more often, but the time of year, climate, and the type of plant are all determining factors in this.
Conclusion
Self-watering Pots are quite expensive but you can also build your own with just 10 dollars of investment. Just check this video ou!
Self-watering planters are a great option available that will save on both time and water; there is no need to constantly check the soil to make sure that it is getting the proper amount of moisture, and they are extremely easy to maintain.
There is a higher cost upfront, but is seen as an investment this is still a great product that should be looked into, regardless of if you are a seasoned gardener, or are just starting to build your garden.
